import os
os.environ['TF_CPP_MIN_LOG_LEVEL'] = '3'  # 设置日志级别为ERROR,以减少警告信息
# 禁用 Gemini 的底层库(gRPC 和 Abseil)在初始化日志警告
os.environ["GRPC_VERBOSITY"] = "ERROR"
os.environ["GLOG_minloglevel"] = "3"  # 0: INFO, 1: WARNING, 2: ERROR, 3: FATAL
os.environ["GLOG_minloglevel"] = "true"
import logging
import tensorflow as tf
tf.get_logger().setLevel(logging.ERROR)
tf.compat.v1.logging.set_verbosity(tf.compat.v1.logging.ERROR)
!export TF_FORCE_GPU_ALLOW_GROWTH=true
from pathlib import Path

temp_dir = Path(".temp")
temp_dir.mkdir(parents=True, exist_ok=True)
# Copyright 2018 The TensorFlow Authors.
#@title Licensed under the Apache License, Version 2.0 (the "License");
# you may not use this file except in compliance with the License.
# You may obtain a copy of the License at
#
# https://www.apache.org/licenses/LICENSE-2.0
#
# Unless required by applicable law or agreed to in writing, software
# distributed under the License is distributed on an "AS IS" BASIS,
# WITHOUT WARRANTIES OR CONDITIONS OF ANY KIND, either express or implied.
# See the License for the specific language governing permissions and
# limitations under the License.
#@title MIT License
#
# Copyright (c) 2017 François Chollet
#
# Permission is hereby granted, free of charge, to any person obtaining a
# copy of this software and associated documentation files (the "Software"),
# to deal in the Software without restriction, including without limitation
# the rights to use, copy, modify, merge, publish, distribute, sublicense,
# and/or sell copies of the Software, and to permit persons to whom the
# Software is furnished to do so, subject to the following conditions:
#
# The above copyright notice and this permission notice shall be included in
# all copies or substantial portions of the Software.
#
# THE SOFTWARE IS PROVIDED "AS IS", WITHOUT WARRANTY OF ANY KIND, EXPRESS OR
# IMPLIED, INCLUDING BUT NOT LIMITED TO THE WARRANTIES OF MERCHANTABILITY,
# FITNESS FOR A PARTICULAR PURPOSE AND NONINFRINGEMENT. IN NO EVENT SHALL
# THE AUTHORS OR COPYRIGHT HOLDERS BE LIABLE FOR ANY CLAIM, DAMAGES OR OTHER
# LIABILITY, WHETHER IN AN ACTION OF CONTRACT, TORT OR OTHERWISE, ARISING
# FROM, OUT OF OR IN CONNECTION WITH THE SOFTWARE OR THE USE OR OTHER
# DEALINGS IN THE SOFTWARE.
Basic regression: Predict fuel efficiency#
 在 TensorFlow.org上查看 在 TensorFlow.org上查看 |
 在 Google Colab 中运行 在 Google Colab 中运行 |
 在 GitHub 上查看源代码 在 GitHub 上查看源代码 |
 下载笔记本 下载笔记本 |
Note: 我们的 TensorFlow 社区翻译了这些文档。因为社区翻译是尽力而为, 所以无法保证它们是最准确的,并且反映了最新的 官方英文文档。如果您有改进此翻译的建议, 请提交 pull request 到 tensorflow/docs GitHub 仓库。要志愿地撰写或者审核译文,请加入 docs-zh-cn@tensorflow.org Google Group。
此教程使用经典的 Auto MPG 数据集并演示了如何构建模型来预测 20 世纪 70 年代末和 20 世纪 80 年代初汽车的燃油效率。为此,您需要为模型提供该时期的许多汽车的描述。这种描述包括诸如气缸、排量、马力和重量等特性。
此示例使用了 Keras API。(请访问 Keras 教程和指南以了解更多信息。)
# Use seaborn for pairplot.
!pip install -q seaborn
import matplotlib.pyplot as plt
import numpy as np
import pandas as pd
import seaborn as sns

# Make NumPy printouts easier to read.
np.set_printoptions(precision=3, suppress=True)
import tensorflow as tf

from tensorflow import keras
from tensorflow.keras import layers

print(tf.__version__)
2.17.0
Auto MPG 数据集#
该数据集可以从 UCI机器学习库 中获取.
获取数据#
首先下载数据集。
url = 'http://archive.ics.uci.edu/ml/machine-learning-databases/auto-mpg/auto-mpg.data'
column_names = ['MPG', 'Cylinders', 'Displacement', 'Horsepower', 'Weight',
                'Acceleration', 'Model Year', 'Origin']

raw_dataset = pd.read_csv(url, names=column_names,
                          na_values='?', comment='\t',
                          sep=' ', skipinitialspace=True)
dataset = raw_dataset.copy()
dataset.tail()
| MPG | Cylinders | Displacement | Horsepower | Weight | Acceleration | Model Year | Origin | |
|---|---|---|---|---|---|---|---|---|
| 393 | 27.0 | 4 | 140.0 | 86.0 | 2790.0 | 15.6 | 82 | 1 |
| 394 | 44.0 | 4 | 97.0 | 52.0 | 2130.0 | 24.6 | 82 | 2 |
| 395 | 32.0 | 4 | 135.0 | 84.0 | 2295.0 | 11.6 | 82 | 1 |
| 396 | 28.0 | 4 | 120.0 | 79.0 | 2625.0 | 18.6 | 82 | 1 |
| 397 | 31.0 | 4 | 119.0 | 82.0 | 2720.0 | 19.4 | 82 | 1 |
数据清洗#
数据集包含一些未知值:
dataset.isna().sum()
MPG             0
Cylinders       0
Displacement    0
Horsepower      6
Weight          0
Acceleration    0
Model Year      0
Origin          0
dtype: int64
为了保证此初始教程简单,请删除这些行:
dataset = dataset.dropna()
"Origin" 列为分类数据,而不是数值数据。因此,下一步是使用 pd.get_dummies 对列中的值进行独热编码。
注:您可以设置 tf.keras.Model 来为您执行这种转换,但这超出了本教程的范围。有关示例,请参阅使用 Keras 预处理层对结构化数据进行分类或加载 CSV 数据教程。
dataset['Origin'] = dataset['Origin'].map({1: 'USA', 2: 'Europe', 3: 'Japan'})
dataset = pd.get_dummies(dataset, columns=['Origin'], prefix='', prefix_sep='', dtype="float32")
dataset.tail()
| MPG | Cylinders | Displacement | Horsepower | Weight | Acceleration | Model Year | Europe | Japan | USA | |
|---|---|---|---|---|---|---|---|---|---|---|
| 393 | 27.0 | 4 | 140.0 | 86.0 | 2790.0 | 15.6 | 82 | 0.0 | 0.0 | 1.0 |
| 394 | 44.0 | 4 | 97.0 | 52.0 | 2130.0 | 24.6 | 82 | 1.0 | 0.0 | 0.0 |
| 395 | 32.0 | 4 | 135.0 | 84.0 | 2295.0 | 11.6 | 82 | 0.0 | 0.0 | 1.0 |
| 396 | 28.0 | 4 | 120.0 | 79.0 | 2625.0 | 18.6 | 82 | 0.0 | 0.0 | 1.0 |
| 397 | 31.0 | 4 | 119.0 | 82.0 | 2720.0 | 19.4 | 82 | 0.0 | 0.0 | 1.0 |
将数据拆分为训练集和测试集#
现在,将数据集拆分为训练集和测试集。您将在模型的最终评估中使用测试集。
train_dataset = dataset.sample(frac=0.8, random_state=0)
test_dataset = dataset.drop(train_dataset.index)
数据检查#
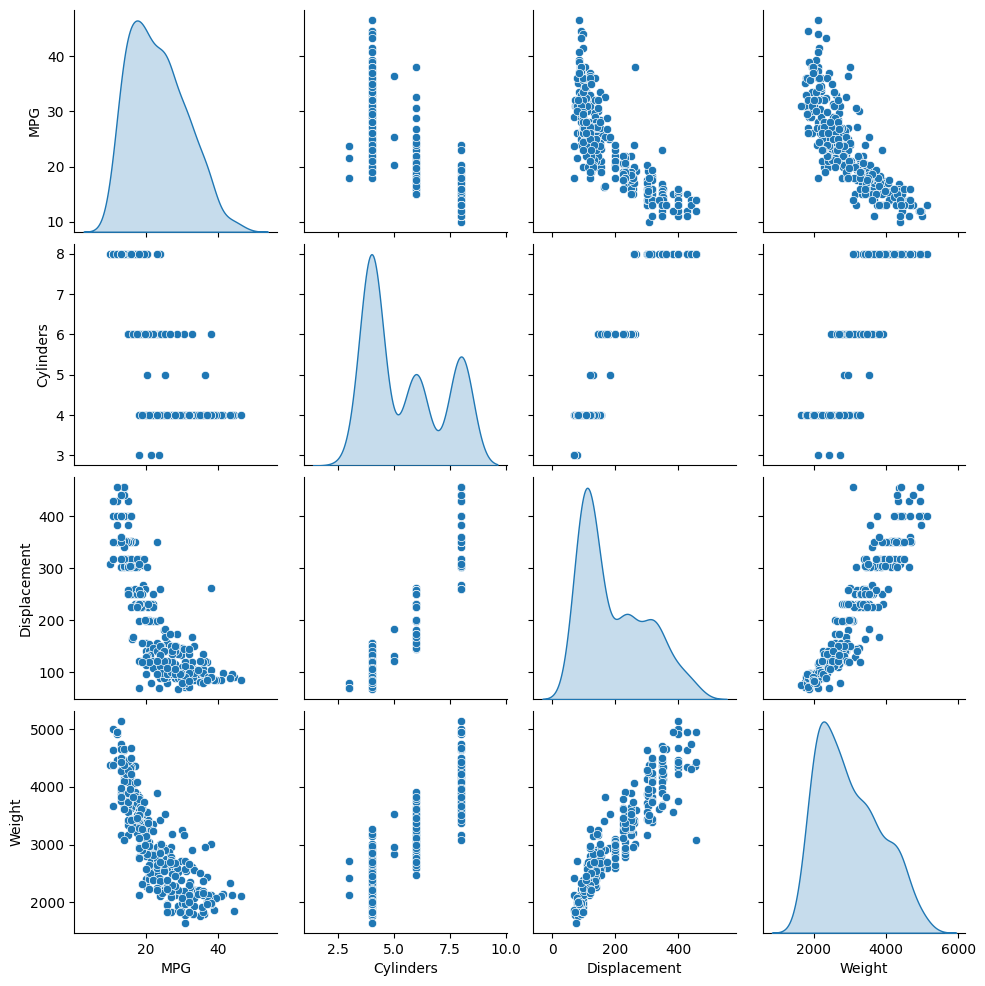
检查训练集中几对列的联合分布。
第一行表明燃油效率 (MPG) 是所有其他参数的函数。其他行表示它们是彼此的函数。
sns.pairplot(train_dataset[['MPG', 'Cylinders', 'Displacement', 'Weight']], diag_kind='kde')
<seaborn.axisgrid.PairGrid at 0x7f2fb757cda0>
让我们也查看一下总体统计信息。请注意每个特征覆盖大为不同的范围:
train_dataset.describe().transpose()
| count | mean | std | min | 25% | 50% | 75% | max | |
|---|---|---|---|---|---|---|---|---|
| MPG | 314.0 | 23.310510 | 7.728652 | 10.0 | 17.00 | 22.0 | 28.95 | 46.6 |
| Cylinders | 314.0 | 5.477707 | 1.699788 | 3.0 | 4.00 | 4.0 | 8.00 | 8.0 |
| Displacement | 314.0 | 195.318471 | 104.331589 | 68.0 | 105.50 | 151.0 | 265.75 | 455.0 |
| Horsepower | 314.0 | 104.869427 | 38.096214 | 46.0 | 76.25 | 94.5 | 128.00 | 225.0 |
| Weight | 314.0 | 2990.251592 | 843.898596 | 1649.0 | 2256.50 | 2822.5 | 3608.00 | 5140.0 |
| Acceleration | 314.0 | 15.559236 | 2.789230 | 8.0 | 13.80 | 15.5 | 17.20 | 24.8 |
| Model Year | 314.0 | 75.898089 | 3.675642 | 70.0 | 73.00 | 76.0 | 79.00 | 82.0 |
| Europe | 314.0 | 0.178344 | 0.383413 | 0.0 | 0.00 | 0.0 | 0.00 | 1.0 |
| Japan | 314.0 | 0.197452 | 0.398712 | 0.0 | 0.00 | 0.0 | 0.00 | 1.0 |
| USA | 314.0 | 0.624204 | 0.485101 | 0.0 | 0.00 | 1.0 | 1.00 | 1.0 |
从标签中分离特征#
将目标值(“标签”)从特征中分离。此标签是您训练模型来预测的值。
train_features = train_dataset.copy()
test_features = test_dataset.copy()

train_labels = train_features.pop('MPG')
test_labels = test_features.pop('MPG')
归一化#
在统计信息表中,可以很轻松地看到每个特征的范围的不同:
train_dataset.describe().transpose()[['mean', 'std']]
| mean | std | |
|---|---|---|
| MPG | 23.310510 | 7.728652 |
| Cylinders | 5.477707 | 1.699788 |
| Displacement | 195.318471 | 104.331589 |
| Horsepower | 104.869427 | 38.096214 |
| Weight | 2990.251592 | 843.898596 |
| Acceleration | 15.559236 | 2.789230 |
| Model Year | 75.898089 | 3.675642 |
| Europe | 0.178344 | 0.383413 |
| Japan | 0.197452 | 0.398712 |
| USA | 0.624204 | 0.485101 |
使用不同的尺度和范围对特征归一化是好的实践。尽管模型可能 在没有特征归一化的情况下收敛,它会使得模型训练更加复杂,并会造成生成的模型依赖输入所使用的单位选择。
归一化十分重要的一个原因是特征会与模型权重相乘。因此,输出尺度和梯度尺度受输入尺度的影响。
尽管模型可能在没有特征归一化的情况下收敛,但归一化会使训练更加稳定。
注:归一化独热特征没有任何好处,这里这样做是为了简单起见。有关如何使用预处理层的更多详细信息,请参阅使用预处理层指南和使用 Keras 预处理层对结构化数据进行分类教程。
归一化层#
tf.keras.layers.Normalization 是一种将特征归一化添加到模型中的简洁且简单的方法。
第一步是创建层:
normalizer = tf.keras.layers.Normalization(axis=-1)
然后,通过调用 Normalization.adapt 以将预处理层的状态拟合到数据:
normalizer.adapt(np.array(train_features))
计算均值和方差,并将它们存储在层中。
print(normalizer.mean.numpy())
[[   5.478  195.318  104.869 2990.252   15.559   75.898    0.178    0.197
     0.624]]
当层被调用时,它会返回输入数据,每个特征将单独归一化:
train_features[:1]
| Cylinders | Displacement | Horsepower | Weight | Acceleration | Model Year | Europe | Japan | USA | |
|---|---|---|---|---|---|---|---|---|---|
| 146 | 4 | 90.0 | 75.0 | 2125.0 | 14.5 | 74 | 0.0 | 0.0 | 1.0 |
first = np.array(train_features[:1])

with np.printoptions(precision=2, suppress=True):
  print('First example:', first)
  print()
  print('Normalized:', normalizer(first).numpy())
First example: [[   4.    90.    75.  2125.    14.5   74.     0.     0.     1. ]]

Normalized: [[-0.87 -1.01 -0.79 -1.03 -0.38 -0.52 -0.47 -0.5   0.78]]
线性回归#
在构建深度神经网络模型之前,首先使用一个和多个变量进行线性回归。
使用一个变量进行线性回归#
从单变量线性回归开始,根据 'Horsepower' 预测 'MPG'。
使用 tf.keras 训练模型通常从定义模型架构开始。使用 tf.keras.Sequential 模型,它表示一系列步骤。
单变量线性回归模型有两个步骤:
使用
tf.keras.layers.Normalization预处理层规一化'Horsepower'输入特征。应用线性变换 (\(y = mx+b\)) 以使用线性层 (
tf.keras.layers.Dense) 生成 1 个输出。
输入的数量可以由 input_shape 参数设置,也可以在模型第一次运行时自动设置。
首先,创建一个由 'Horsepower' 特征构成的 NumPy 数组。然后,实例化 tf.keras.layers.Normalization 并将其状态拟合到 horsepower 数据:
horsepower = np.array(train_features['Horsepower'])

horsepower_normalizer = layers.Normalization(axis=None)
horsepower_normalizer.adapt(horsepower)
构建 Keras 序贯模型:
horsepower_model = tf.keras.Sequential([
    layers.Input(shape=(1,)),
    horsepower_normalizer,
    layers.Dense(units=1)
])

horsepower_model.summary()
Model: "sequential"
┏━━━━━━━━━━━━━━━━━━━━━━━━━━━━━━━━━┳━━━━━━━━━━━━━━━━━━━━━━━━┳━━━━━━━━━━━━━━━┓
┃ Layer (type)                    ┃ Output Shape           ┃       Param # ┃
┡━━━━━━━━━━━━━━━━━━━━━━━━━━━━━━━━━╇━━━━━━━━━━━━━━━━━━━━━━━━╇━━━━━━━━━━━━━━━┩
│ normalization_1 (Normalization) │ (None, 1)              │             3 │
├─────────────────────────────────┼────────────────────────┼───────────────┤
│ dense (Dense)                   │ (None, 1)              │             2 │
└─────────────────────────────────┴────────────────────────┴───────────────┘
Total params: 5 (24.00 B)
Trainable params: 2 (8.00 B)
Non-trainable params: 3 (16.00 B)
此模型将根据 'Horsepower' 预测 'MPG'。
在前 10 个“马力”值上运行未经训练的模型。输出不会很好,但您会看到它具有预期的形状 (10, 1):
horsepower_model.predict(horsepower[:10])
1/1 ━━━━━━━━━━━━━━━━━━━━ 0s 160ms/step
WARNING: All log messages before absl::InitializeLog() is called are written to STDERR
I0000 00:00:1729738825.939939 3280987 service.cc:146] XLA service 0x7f2c40004cf0 initialized for platform CUDA (this does not guarantee that XLA will be used). Devices:
I0000 00:00:1729738825.939973 3280987 service.cc:154]   StreamExecutor device (0): NVIDIA GeForce RTX 3090, Compute Capability 8.6
I0000 00:00:1729738825.939981 3280987 service.cc:154]   StreamExecutor device (1): NVIDIA GeForce RTX 2080 Ti, Compute Capability 7.5
I0000 00:00:1729738826.047359 3280987 device_compiler.h:188] Compiled cluster using XLA!  This line is logged at most once for the lifetime of the process.
array([[-0.019],
       [-0.011],
       [ 0.035],
       [-0.026],
       [-0.024],
       [-0.009],
       [-0.028],
       [-0.024],
       [-0.006],
       [-0.011]], dtype=float32)
构建模型后,使用 Keras Model.compile 方法配置训练过程。要编译的最重要参数是 loss 和 optimizer,因为它们定义了将要优化的内容 (mean_absolute_error) 以及优化的方法(使用 tf.keras.optimizers.Adam)。
horsepower_model.compile(
    optimizer=tf.keras.optimizers.Adam(learning_rate=0.1),
    loss='mean_absolute_error')
使用 Keras Model.fit 执行 100 个周期的训练:
%%time
history = horsepower_model.fit(
    train_features['Horsepower'],
    train_labels,
    epochs=100,
    # Suppress logging.
    verbose=0,
    # Calculate validation results on 20% of the training data.
    validation_split = 0.2)
CPU times: user 7.16 s, sys: 1.3 s, total: 8.46 s
Wall time: 6.55 s
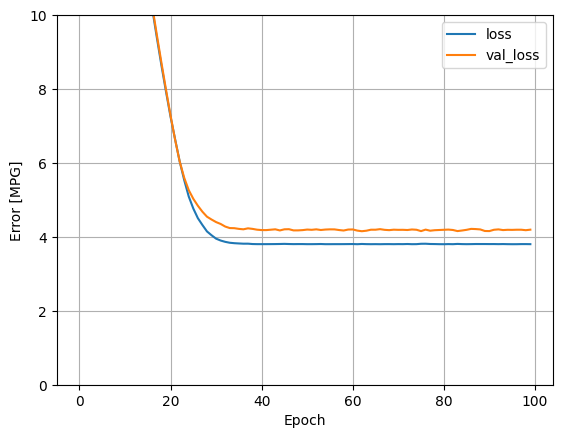
使用 history 对象中存储的统计信息呈现模型的训练进度:
hist = pd.DataFrame(history.history)
hist['epoch'] = history.epoch
hist.tail()
| loss | val_loss | epoch | |
|---|---|---|---|
| 95 | 3.801883 | 4.189487 | 95 |
| 96 | 3.802329 | 4.193586 | 96 |
| 97 | 3.804766 | 4.193433 | 97 |
| 98 | 3.804802 | 4.180914 | 98 |
| 99 | 3.803075 | 4.195196 | 99 |
def plot_loss(history):
  plt.plot(history.history['loss'], label='loss')
  plt.plot(history.history['val_loss'], label='val_loss')
  plt.ylim([0, 10])
  plt.xlabel('Epoch')
  plt.ylabel('Error [MPG]')
  plt.legend()
  plt.grid(True)
plot_loss(history)
收集测试集上的结果,供后面使用:
test_results = {}

test_results['horsepower_model'] = horsepower_model.evaluate(
    test_features['Horsepower'],
    test_labels, verbose=0)
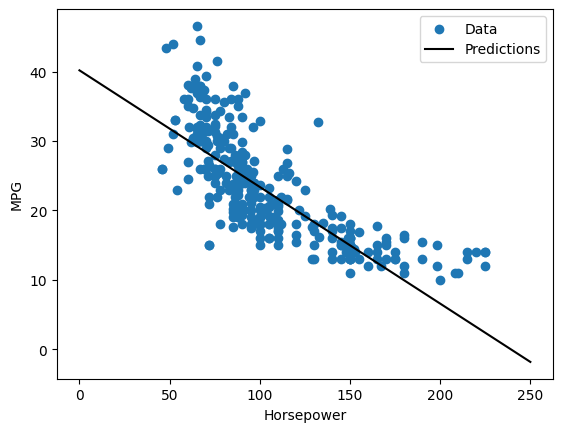
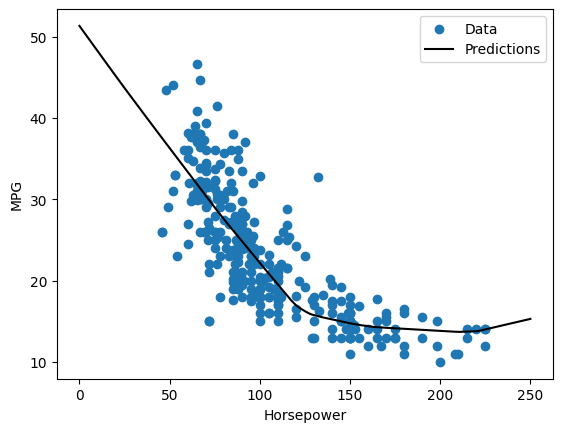
由于这是一个单变量回归,很容易将模型的预测视为输入的函数:
x = tf.linspace(0.0, 250, 251)
y = horsepower_model.predict(x)
8/8 ━━━━━━━━━━━━━━━━━━━━ 0s 18ms/step
def plot_horsepower(x, y):
  plt.scatter(train_features['Horsepower'], train_labels, label='Data')
  plt.plot(x, y, color='k', label='Predictions')
  plt.xlabel('Horsepower')
  plt.ylabel('MPG')
  plt.legend()
plot_horsepower(x, y)
使用多个输入进行线性回归#
您可以使用几乎相同的设置根据多个输入进行预测。此模型仍然执行相同的 \(y = mx+b\),只是 \(m\) 是一个矩阵,而 \(b\) 是一个向量。
再次创建一个两步 Keras 序贯模型,第一层为您之前定义并拟合到整个数据集的 normalizer (tf.keras.layers.Normalization(axis=-1)):
linear_model = tf.keras.Sequential([
    normalizer,
    layers.Dense(units=1)
])
当您对一批输入调用 Model.predict 时,它会为每个样本生成 units=1 输出。
linear_model.predict(train_features[:10])
1/1 ━━━━━━━━━━━━━━━━━━━━ 0s 200ms/step
array([[-1.12 ],
       [-0.624],
       [ 1.936],
       [-2.406],
       [-0.512],
       [ 0.408],
       [-0.474],
       [ 0.402],
       [ 0.685],
       [ 0.963]], dtype=float32)
当您调用模型时,将构建其权重矩阵 – 可以看到 kernel 权重(\(y=mx+b\) 中的 \(m\))的形状为 (9, 1):
linear_model.layers[1].kernel
<KerasVariable shape=(9, 1), dtype=float32, path=sequential_1/dense_1/kernel>
使用 Keras Model.compile 配置模型并使用 Model.fit 训练 100 个周期:
linear_model.compile(
    optimizer=tf.keras.optimizers.Adam(learning_rate=0.1),
    loss='mean_absolute_error')
%%time
history = linear_model.fit(
    train_features,
    train_labels,
    epochs=100,
    # Suppress logging.
    verbose=0,
    # Calculate validation results on 20% of the training data.
    validation_split = 0.2)
CPU times: user 7.04 s, sys: 1.22 s, total: 8.25 s
Wall time: 6.44 s
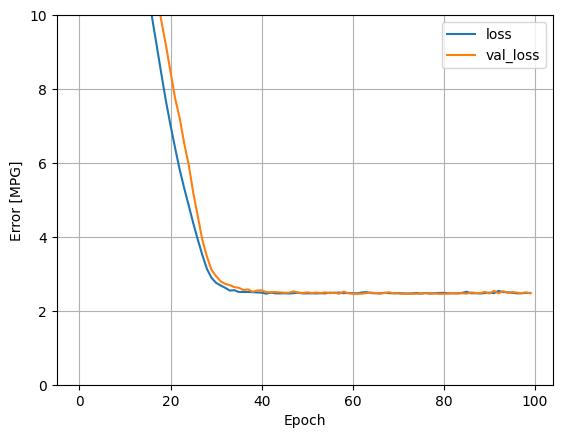
使用此回归模型中的所有输入可以实现比 horsepower_model(具有一个输入)低得多的训练和验证误差:
plot_loss(history)
收集测试集上的结果,供后面使用:
test_results['linear_model'] = linear_model.evaluate(
    test_features, test_labels, verbose=0)
使用深度神经网络 (DNN) 进行回归#
在上一部分中,您为单输入和多输入实现了两个线性模型。
在此,您将实现单输入和多输入 DNN 模型。
除了将模型扩展为包括一些“隐藏”非线性层之外,代码基本相同。此处的名称“隐藏”仅表示不直接连接到输入或输出。
这些模型包含的层比线性模型多一些:
归一化层和以前一样(对于单输入模型使用
horsepower_normalizer,对于多输入模型使用normalizer)。使用 ReLU (
relu) 激活函数非线性的两个隐藏非线性Dense层。一个线性
Dense单输出层。
两个模型都将使用相同的训练过程,因此 compile 方法包含在下面的 build_and_compile_model 函数中。
def build_and_compile_model(norm):
  model = keras.Sequential([
      norm,
      layers.Dense(64, activation='relu'),
      layers.Dense(64, activation='relu'),
      layers.Dense(1)
  ])

  model.compile(loss='mean_absolute_error',
                optimizer=tf.keras.optimizers.Adam(0.001))
  return model
使用 DNN 和单输入进行回归#
创建一个 DNN 模型,仅将 'Horsepower' 作为输入,将 'Horsepower'(之前定义)作为归一化层:
dnn_horsepower_model = build_and_compile_model(horsepower_normalizer)
此模型比线性模型的可训练参数多很多。
dnn_horsepower_model.summary()
Model: "sequential_2"
┏━━━━━━━━━━━━━━━━━━━━━━━━━━━━━━━━━┳━━━━━━━━━━━━━━━━━━━━━━━━┳━━━━━━━━━━━━━━━┓
┃ Layer (type)                    ┃ Output Shape           ┃       Param # ┃
┡━━━━━━━━━━━━━━━━━━━━━━━━━━━━━━━━━╇━━━━━━━━━━━━━━━━━━━━━━━━╇━━━━━━━━━━━━━━━┩
│ normalization_1 (Normalization) │ (None, 1)              │             3 │
├─────────────────────────────────┼────────────────────────┼───────────────┤
│ dense_2 (Dense)                 │ ?                      │   0 (unbuilt) │
├─────────────────────────────────┼────────────────────────┼───────────────┤
│ dense_3 (Dense)                 │ ?                      │   0 (unbuilt) │
├─────────────────────────────────┼────────────────────────┼───────────────┤
│ dense_4 (Dense)                 │ ?                      │   0 (unbuilt) │
└─────────────────────────────────┴────────────────────────┴───────────────┘
Total params: 3 (16.00 B)
Trainable params: 0 (0.00 B)
Non-trainable params: 3 (16.00 B)
使用 Keras Model.fit 训练模型:
%%time
history = dnn_horsepower_model.fit(
    train_features['Horsepower'],
    train_labels,
    validation_split=0.2,
    verbose=0, epochs=100)
CPU times: user 18.3 s, sys: 1.67 s, total: 19.9 s
Wall time: 9.41 s
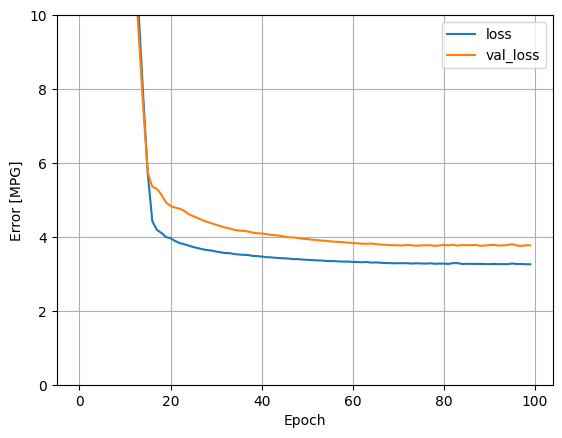
此模型略优于线性单输入 horsepower_model:
plot_loss(history)
如果您将预测值绘制为 'Horsepower' 的函数,应看到此模型如何利用隐藏层提供的非线性:
x = tf.linspace(0.0, 250, 251)
y = dnn_horsepower_model.predict(x)
8/8 ━━━━━━━━━━━━━━━━━━━━ 1s 48ms/step
plot_horsepower(x, y)
收集测试集上的结果,供后面使用:
test_results['dnn_horsepower_model'] = dnn_horsepower_model.evaluate(
    test_features['Horsepower'], test_labels,
    verbose=0)
使用 DNN 和多输入进行回归#
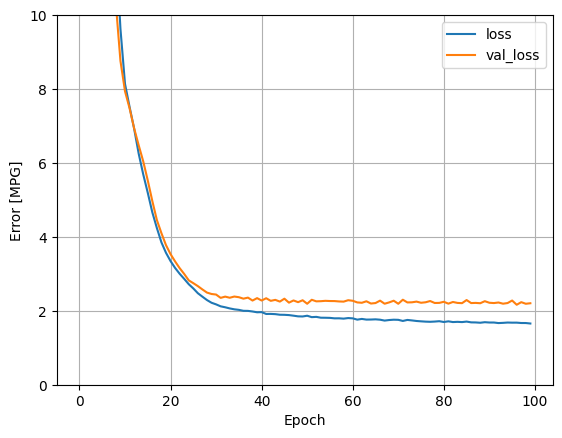
使用所有输入重复前面的过程。模型的性能在验证数据集上会略有提高。
dnn_model = build_and_compile_model(normalizer)
dnn_model.summary()
Model: "sequential_3"
┏━━━━━━━━━━━━━━━━━━━━━━━━━━━━━━━━━┳━━━━━━━━━━━━━━━━━━━━━━━━┳━━━━━━━━━━━━━━━┓
┃ Layer (type)                    ┃ Output Shape           ┃       Param # ┃
┡━━━━━━━━━━━━━━━━━━━━━━━━━━━━━━━━━╇━━━━━━━━━━━━━━━━━━━━━━━━╇━━━━━━━━━━━━━━━┩
│ normalization (Normalization)   │ (10, 9)                │            19 │
├─────────────────────────────────┼────────────────────────┼───────────────┤
│ dense_5 (Dense)                 │ ?                      │   0 (unbuilt) │
├─────────────────────────────────┼────────────────────────┼───────────────┤
│ dense_6 (Dense)                 │ ?                      │   0 (unbuilt) │
├─────────────────────────────────┼────────────────────────┼───────────────┤
│ dense_7 (Dense)                 │ ?                      │   0 (unbuilt) │
└─────────────────────────────────┴────────────────────────┴───────────────┘
Total params: 19 (80.00 B)
Trainable params: 0 (0.00 B)
Non-trainable params: 19 (80.00 B)
%%time
history = dnn_model.fit(
    train_features,
    train_labels,
    validation_split=0.2,
    verbose=0, epochs=100)
CPU times: user 9.77 s, sys: 1.29 s, total: 11.1 s
Wall time: 8.31 s
plot_loss(history)
收集测试集上的结果:
test_results['dnn_model'] = dnn_model.evaluate(test_features, test_labels, verbose=0)
性能#
所有模型都已经过训练,因此您可以查看它们的测试集性能:
pd.DataFrame(test_results, index=['Mean absolute error [MPG]']).T
| Mean absolute error [MPG] | |
|---|---|
| horsepower_model | 3.646849 |
| linear_model | 2.500054 |
| dnn_horsepower_model | 2.905027 |
| dnn_model | 1.643063 |
这些结果与训练期间看到的验证误差相匹配。
做预测#
您现在可以使用 Keras Model.predict,在测试集上利用 dnn_model 进行预测并查看损失:
test_predictions = dnn_model.predict(test_features).flatten()

a = plt.axes(aspect='equal')
plt.scatter(test_labels, test_predictions)
plt.xlabel('True Values [MPG]')
plt.ylabel('Predictions [MPG]')
lims = [0, 50]
plt.xlim(lims)
plt.ylim(lims)
_ = plt.plot(lims, lims)
3/3 ━━━━━━━━━━━━━━━━━━━━ 1s 175ms/step
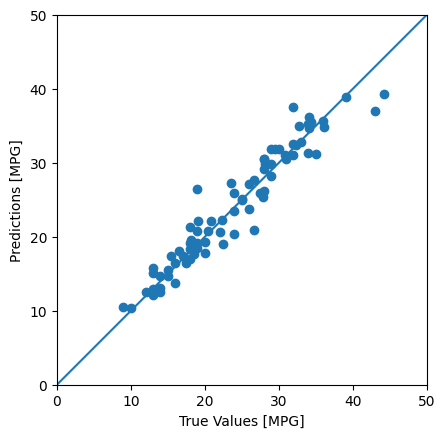
看起来模型预测得相当出色。
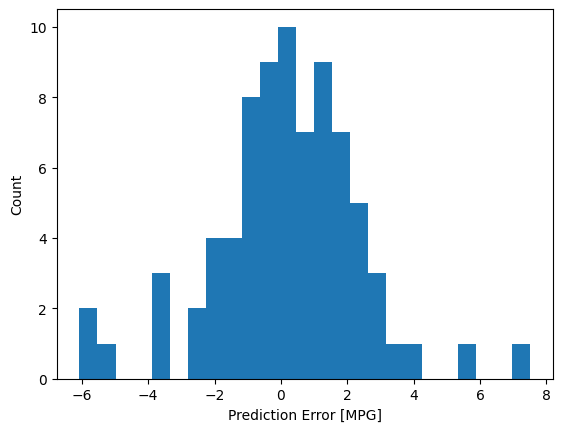
现在,查看一下误差分布:
error = test_predictions - test_labels
plt.hist(error, bins=25)
plt.xlabel('Prediction Error [MPG]')
_ = plt.ylabel('Count')
如果您对模型感到满意,请使用 Model.save 将其保存以备后续使用:
dnn_model.save(temp_dir/'dnn_model.keras')
如果您重新加载模型,它会给出相同的输出:
reloaded = tf.keras.models.load_model(temp_dir/'dnn_model.keras')

test_results['reloaded'] = reloaded.evaluate(
    test_features, test_labels, verbose=0)
pd.DataFrame(test_results, index=['Mean absolute error [MPG]']).T
| Mean absolute error [MPG] | |
|---|---|
| horsepower_model | 3.646849 |
| linear_model | 2.500054 |
| dnn_horsepower_model | 2.905027 |
| dnn_model | 1.643063 |
| reloaded | 1.643063 |
结论#
本笔记本 (notebook) 介绍了一些处理回归问题的技术。
均方误差 (MSE) (
tf.keras.losses.MeanSquaredError) 和平均绝对误差 (MAE) (tf.keras.losses.MeanAbsoluteError) 是用于回归问题的常见损失函数。MAE 对异常值不那么敏感。不同的损失函数用于分类问题。类似的,用于回归的评估指标与分类不同。 常见的回归指标是平均绝对误差(MAE)。
当数字输入数据特征的值存在不同范围时,每个特征应独立缩放到相同范围。
过拟合是 DNN 模型的常见问题,但本教程不存在此问题。有关这方面的更多帮助,请访问过拟合和欠拟合教程。


