##### Copyright 2019 The TensorFlow Authors.
#@title Licensed under the Apache License, Version 2.0 (the "License");
# you may not use this file except in compliance with the License.
# You may obtain a copy of the License at
#
# https://www.apache.org/licenses/LICENSE-2.0
#
# Unless required by applicable law or agreed to in writing, software
# distributed under the License is distributed on an "AS IS" BASIS,
# WITHOUT WARRANTIES OR CONDITIONS OF ANY KIND, either express or implied.
# See the License for the specific language governing permissions and
# limitations under the License.
使用 DTensor 进行分布式训练#
 View on TensorFlow.org View on TensorFlow.org
|
 在 Google Colab 中运行 在 Google Colab 中运行 |
 在 GitHub 上查看源代码 在 GitHub 上查看源代码
|
 下载笔记本 下载笔记本 |
文本特征向量#
DTensor 为您提供了一种进行跨设备分布式模型训练的方式,可以帮助您提高效率、可靠性和可扩展性。有关 DTensor 概念的更多详细信息,请参阅 DTensor 编程指南。
在本教程中,您将使用 DTensor 训练一个情感分析模型。此示例演示了三种分布式训练方案:
数据并行训练,此方案会将训练样本分片(分区)至设备。
模型并行训练,此方案会将模型变量分片至设备。
空间并行训练,此方案会将输入数据的特征分片至设备。(也称为空间分区)
本教程训练部分灵感源自于 Kaggle 情感分析指南笔记本。要了解完整的训练和评估工作流(未使用 DTensor),请参阅该笔记本。
本教程将逐步完成以下步骤:
首先从一些数据清理开始,旨在获得词例化语句及其情感极性的
tf.data.Dataset。接下来,使用自定义 Dense 层和 BatchNorm 层构建 MLP 模型。使用
tf.Module跟踪推断变量。模型构造函数将使用额外的Layout参数来控制变量的分片。在训练方面,您会先将数据并行训练与
tf.experimental.dtensor的检查点特征结合使用。然后继续进行模型并行训练和空间并行训练。最后一部分简要介绍了截至 TensorFlow 2.9 版本的
tf.saved_model与tf.experimental.dtensor之间的交互。
安装#
DTensor 是 TensorFlow 2.9.0 版本的一部分。
!pip install --quiet --upgrade --pre tensorflow tensorflow-datasets
接下来,导入 tensorflow 和 tensorflow.experimental.dtensor。然后,将 TensorFlow 配置为使用 8 个虚拟 CPU。
尽管本示例使用了 CPU,但 DTensor 在 CPU、GPU 或 TPU 设备上的工作方式相同。
import tempfile
import numpy as np
import tensorflow_datasets as tfds

import tensorflow as tf

from tensorflow.experimental import dtensor
print('TensorFlow version:', tf.__version__)
def configure_virtual_cpus(ncpu):
  phy_devices = tf.config.list_physical_devices('CPU')
  tf.config.set_logical_device_configuration(phy_devices[0], [
        tf.config.LogicalDeviceConfiguration(),
    ] * ncpu)

configure_virtual_cpus(8)
DEVICES = [f'CPU:{i}' for i in range(8)]

tf.config.list_logical_devices('CPU')
下载数据集#
下载 IMDB 评论数据集以训练情感分析模型。
train_data = tfds.load('imdb_reviews', split='train', shuffle_files=True, batch_size=64)
train_data
准备数据#
首先,将文本词例化。此处使用独热编码的扩展,即 tf.keras.layers.TextVectorization 的 'tf_idf' 模式。
为保证速度,将词例数量限制为 1200。
为使
tf.Module保持简单,在训练之前运行TextVectorization作为预处理步骤。
数据清理部分的最终结果是一个词例化文本为 x、标签为 y 的 Dataset。
注:将运行 TextVectorization 作为预处理步骤既非常规做法,也非推荐做法,因为这种方式需要假定训练数据适合客户端内存,但实际情况并非总是如此。
text_vectorization = tf.keras.layers.TextVectorization(output_mode='tf_idf', max_tokens=1200, output_sequence_length=None)
text_vectorization.adapt(data=train_data.map(lambda x: x['text']))
def vectorize(features):
  return text_vectorization(features['text']), features['label']

train_data_vec = train_data.map(vectorize)
train_data_vec
使用 DTensor 构建神经网络#
现在,使用 DTensor 构建一个多层感知器 (MLP) 网络。网络将使用全连接 Dense 层和 BatchNorm 层。
DTensor 会通过常规 TensorFlow 运算的单程序多数据 (SPMD) 扩展来扩展 TensorFlow,具体取决于其输入 Tensor 和变量的 dtensor.Layout 特性。
DTensor 感知层的变量为 dtensor.DVariable,DTensor 感知层对象的构造函数除了接受常规层参数外,还会接受额外的 Layout 输入。
注:截至 TensorFlow 2.9 版本,tf.keras.layer.Dense 和 tf.keras.layer.BatchNormalization 等 Keras 层接受 dtensor.Layout 参数。有关将 Keras 与 DTensor 结合使用的更多信息,请参阅 DTensor Keras 集成教程。
Dense 层#
以下自定义 Dense 层定义了 2 个层变量:\(W_{ij}\) 为权重变量,\(b_i\) 为偏置项变量。
布局推导#
此结果源自于以下观测值:
对矩阵点积 \(t_j = \sum_i x_i W_{ij}\) 的运算数的首选 DTensor 分片方式为沿 \(i\) 轴以相同的方式对 \(\mathbf{W}\) 和 \(\mathbf{x}\) 进行分片。
对矩阵和 \(t_j + b_j\) 的运算数的首选 DTensor 分片方式为沿 \(j\) 轴以相同的方式对 \(\mathbf{t}\) 和 \(\mathbf{b}\) 进行分片。
class Dense(tf.Module):

  def __init__(self, input_size, output_size,
               init_seed, weight_layout, activation=None):
    super().__init__()

    random_normal_initializer = tf.function(tf.random.stateless_normal)

    self.weight = dtensor.DVariable(
        dtensor.call_with_layout(
            random_normal_initializer, weight_layout,
            shape=[input_size, output_size],
            seed=init_seed
            ))
    if activation is None:
      activation = lambda x:x
    self.activation = activation

    # bias is sharded the same way as the last axis of weight.
    bias_layout = weight_layout.delete([0])

    self.bias = dtensor.DVariable(
        dtensor.call_with_layout(tf.zeros, bias_layout, [output_size]))

  def __call__(self, x):
    y = tf.matmul(x, self.weight) + self.bias
    y = self.activation(y)

    return y
BatchNorm#
批归一化层有助于避免在训练时折叠模式。在此情况下,添加批归一化层有助于在训练模型时避免产生只生成零的模型。
下面的自定义 BatchNorm 层的构造函数不会接受 Layout 参数。这是因为 BatchNorm 没有层变量。这仍适用于 DTensor,因为层的唯一输入“x”已经是代表全局批次的 DTensor。
注:使用 DTensor 时,输入张量“x”始终代表全局批次。因此,tf.nn.batch_normalization 将应用于全局批次。这不同于使用 tf.distribute.MirroredStrategy 进行的训练,其中张量“x”仅代表批次的副本分片(局部批次)。
class BatchNorm(tf.Module):

  def __init__(self):
    super().__init__()

  def __call__(self, x, training=True):
    if not training:
      # This branch is not used in the Tutorial.
      pass
    mean, variance = tf.nn.moments(x, axes=[0])
    return tf.nn.batch_normalization(x, mean, variance, 0.0, 1.0, 1e-5)
全功能批归一化层(例如 tf.keras.layers.BatchNormalization)将需要其变量的 Layout 参数。
def make_keras_bn(bn_layout):
  return tf.keras.layers.BatchNormalization(gamma_layout=bn_layout,
                                            beta_layout=bn_layout,
                                            moving_mean_layout=bn_layout,
                                            moving_variance_layout=bn_layout,
                                            fused=False)
将层放置到一起#
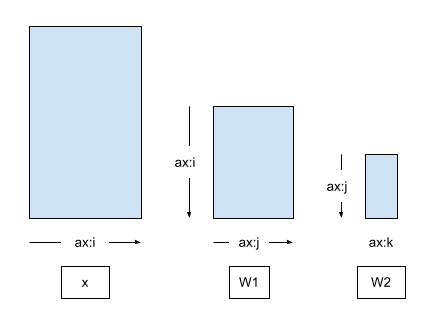
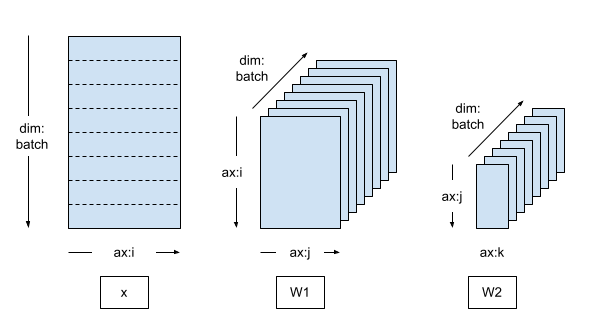
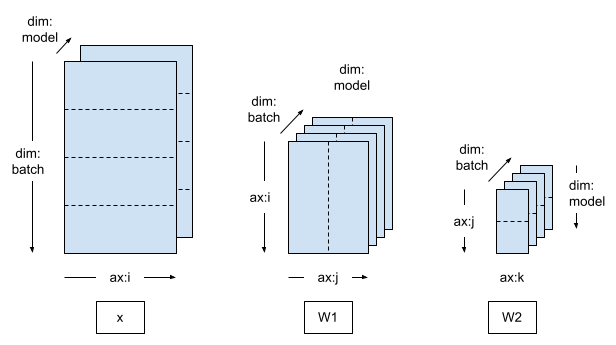
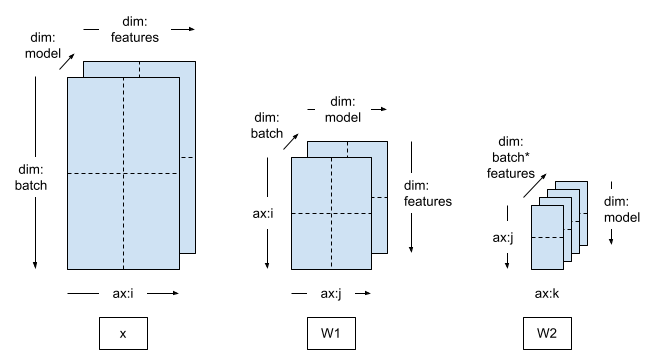
接下来,使用上述构建块构建多层感知器 (MLP) 网络。下图显示了两个 Dense 层的输入 x 与权重矩阵之间的轴关系,未应用任何 DTensor 分片或复制。

第一个 Dense 层的输出会传递到第二个 Dense 层的输入(在 BatchNorm 之后)。因此,第一个 Dense 层的输出 (\(\mathbf{W_1}\)) 和第二个 Dense 层的输入 (\(\mathbf{W_2}\)) 的首选 DTensor 分片方式为沿公共轴 \(\hat{j}\) 以相同方式对 \(\mathbf{W_1}\) 和 \(\mathbf{W_2}\) 进行分片
尽管布局推导显示 2 种布局并非独立,但为了保证模型接口的简单性,MLP 将接受 2 个 Layout 参数,每个 Dense 层一个。
from typing import Tuple

class MLP(tf.Module):

  def __init__(self, dense_layouts: Tuple[dtensor.Layout, dtensor.Layout]):
    super().__init__()

    self.dense1 = Dense(
        1200, 48, (1, 2), dense_layouts[0], activation=tf.nn.relu)
    self.bn = BatchNorm()
    self.dense2 = Dense(48, 2, (3, 4), dense_layouts[1])

  def __call__(self, x):
    y = x
    y = self.dense1(y)
    y = self.bn(y)
    y = self.dense2(y)
    return y
在布局推导约束的正确性与 API 的简单性之间进行权衡是使用 DTensor 的 API 的一项常见设计要点。也可以捕获具有不同 API 的 Layout 之间的依赖关系。例如,MLPStricter 类会在构造函数中创建 Layout 对象。
class MLPStricter(tf.Module):

  def __init__(self, mesh, input_mesh_dim, inner_mesh_dim1, output_mesh_dim):
    super().__init__()

    self.dense1 = Dense(
        1200, 48, (1, 2), dtensor.Layout([input_mesh_dim, inner_mesh_dim1], mesh),
        activation=tf.nn.relu)
    self.bn = BatchNorm()
    self.dense2 = Dense(48, 2, (3, 4), dtensor.Layout([inner_mesh_dim1, output_mesh_dim], mesh))


  def __call__(self, x):
    y = x
    y = self.dense1(y)
    y = self.bn(y)
    y = self.dense2(y)
    return y
为确保模型能够正常运行,请使用完全复制的布局和完全复制的一批 'x' 输入来检查您的模型。
WORLD = dtensor.create_mesh([("world", 8)], devices=DEVICES)

model = MLP([dtensor.Layout.replicated(WORLD, rank=2),
             dtensor.Layout.replicated(WORLD, rank=2)])

sample_x, sample_y = train_data_vec.take(1).get_single_element()
sample_x = dtensor.copy_to_mesh(sample_x, dtensor.Layout.replicated(WORLD, rank=2))
print(model(sample_x))
将数据移动到设备#
通常,tf.data 迭代器(和其他数据获取方法)会产生由本地主机设备内存支持的张量对象。此数据必须传输到支持 DTensor 的张量分量的加速器设备内存。
dtensor.copy_to_mesh 并不适合这种情况,由于 DTensor 以全局为视角,因此会将输入张量复制到所有设备上。有鉴于此,在本教程中,您将使用一个辅助函数 repack_local_tensor 以便于数据传输。此辅助函数会使用 dtensor.pack 将用于副本的全局批次的分片发送(并且仅发送)到支持副本的设备。
此简化函数假定使用单客户端。在多客户端应用中确定拆分本地张量的正确方式以及在拆分的各个部分与本地设备之间建立映射可能会比较困难。
我们计划提供同时支持单客户端和多客户端应用的额外 DTensor API 来简化 tf.data 集成。敬请期待。
def repack_local_tensor(x, layout):
  """Repacks a local Tensor-like to a DTensor with layout.

  This function assumes a single-client application.
  """
  x = tf.convert_to_tensor(x)
  sharded_dims = []

  # For every sharded dimension, use tf.split to split the along the dimension.
  # The result is a nested list of split-tensors in queue[0].
  queue = [x]
  for axis, dim in enumerate(layout.sharding_specs):
    if dim == dtensor.UNSHARDED:
      continue
    num_splits = layout.shape[axis]
    queue = tf.nest.map_structure(lambda x: tf.split(x, num_splits, axis=axis), queue)
    sharded_dims.append(dim)

  # Now we can build the list of component tensors by looking up the location in
  # the nested list of split-tensors created in queue[0].
  components = []
  for locations in layout.mesh.local_device_locations():
    t = queue[0]
    for dim in sharded_dims:
      split_index = locations[dim]  # Only valid on single-client mesh.
      t = t[split_index]
    components.append(t)

  return dtensor.pack(components, layout)
数据并行训练#
在本部分中,您将使用数据并行训练来训练您的 MLP 模型。以下部分将演示模型并行训练和空间并行训练。
数据并行训练是分布式机器学习的常用方案:
分别在 N 台设备上复制模型变量。
将全局批次拆分成 N 个按副本批次。
每个按副本批次都在副本设备上进行训练。
在对所有副本共同执行数据加权之前进行梯度归约。
数据并行训练能够根据设备数量提供近乎线性的速度提升。
创建数据并行网格#
典型的数据并行训练循环使用由单个 batch 维度组成的 DTensor Mesh,其中每个设备都将成为从全局批次接收分片的副本。

复制的模型在副本上运行,因此模型变量是完全复制的(未分片)。
mesh = dtensor.create_mesh([("batch", 8)], devices=DEVICES)

model = MLP([dtensor.Layout([dtensor.UNSHARDED, dtensor.UNSHARDED], mesh),
             dtensor.Layout([dtensor.UNSHARDED, dtensor.UNSHARDED], mesh),])
将训练数据打包到 DTensor#
训练数据批次应打包到沿 'batch'(第一)轴分片的 DTensor 中,以便 DTensor 将训练数据均匀分布到 'batch' 网格维度。
注:在 DTensor 中,batch size 始终是指全局批次大小。选择批次大小时,应使其能够被 batch 网格维数整除。
def repack_batch(x, y, mesh):
  x = repack_local_tensor(x, layout=dtensor.Layout(['batch', dtensor.UNSHARDED], mesh))
  y = repack_local_tensor(y, layout=dtensor.Layout(['batch'], mesh))
  return x, y

sample_x, sample_y = train_data_vec.take(1).get_single_element()
sample_x, sample_y = repack_batch(sample_x, sample_y, mesh)

print('x', sample_x[:, 0])
print('y', sample_y)
训练步骤#
此示例使用的是随机梯度下降优化器和自定义训练循环 (CTL)。有关这些主题的更多信息,请参阅自定义训练循环指南和演练。
将 train_step 封装为 tf.function 以指示该函数体将作为 TensorFlow 计算图进行跟踪。train_step 的函数体由前向推断传递、反向梯度传递和变量更新组成。
请注意,train_step 的函数体不包含任何特殊的 DTensor 注解。相反,train_step 仅含用于处理来自输入批次和模型全局视图的输入 x 和 y 的高级 TensorFlow 运算。训练步骤中剔除了所有 DTensor 注解(Mesh、Layout)。
# Refer to the CTL (custom training loop guide)
@tf.function
def train_step(model, x, y, learning_rate=tf.constant(1e-4)):
  with tf.GradientTape() as tape:
    logits = model(x)
    # tf.reduce_sum sums the batch sharded per-example loss to a replicated
    # global loss (scalar).
    loss = tf.reduce_sum(
        tf.nn.sparse_softmax_cross_entropy_with_logits(
            logits=logits, labels=y))
  parameters = model.trainable_variables
  gradients = tape.gradient(loss, parameters)
  for parameter, parameter_gradient in zip(parameters, gradients):
    parameter.assign_sub(learning_rate * parameter_gradient)

  # Define some metrics
  accuracy = 1.0 - tf.reduce_sum(tf.cast(tf.argmax(logits, axis=-1, output_type=tf.int64) != y, tf.float32)) / x.shape[0]
  loss_per_sample = loss / len(x)
  return {'loss': loss_per_sample, 'accuracy': accuracy}
检查点#
您可以使用开箱即用的 tf.train.Checkpoint 为 DTensor 模型设置检查点。保存和还原分片 DVariable 将执行高效的分片保存和还原。目前,使用 tf.train.Checkpoint.save 和 tf.train.Checkpoint.restore 时,所有 DVariable 必须在同一个主机网格上,DVariable 和常规变量不能一起保存。您可以在本指南中详细了解检查点设置。
还原 DTensor 检查点时,变量的 Layout 可能与保存检查点时不同。也就是说,保存 DTensor 模型与布局和网格无关,只会影响分片保存的效率。您可以保存具有一种网格和布局的 DTensor 模型,并在不同的网格和布局上进行还原。本教程利用此功能继续“模型并行训练”和“空间并行训练”部分的训练。
CHECKPOINT_DIR = tempfile.mkdtemp()

def start_checkpoint_manager(model):
  ckpt = tf.train.Checkpoint(root=model)
  manager = tf.train.CheckpointManager(ckpt, CHECKPOINT_DIR, max_to_keep=3)

  if manager.latest_checkpoint:
    print("Restoring a checkpoint")
    ckpt.restore(manager.latest_checkpoint).assert_consumed()
  else:
    print("New training")
  return manager
训练循环#
对于数据并行训练方案,需要训练几个周期并报告进度。模型训练 3 个周期是不够的 – 50% 的准确率无异于随机猜测。
启用检查点,以便稍后继续训练。在下一部分中,您将加载检查点并使用另一种并行方案进行训练。
num_epochs = 2
manager = start_checkpoint_manager(model)

for epoch in range(num_epochs):
  step = 0
  pbar = tf.keras.utils.Progbar(target=int(train_data_vec.cardinality()), stateful_metrics=[])
  metrics = {'epoch': epoch}
  for x,y in train_data_vec:

    x, y = repack_batch(x, y, mesh)

    metrics.update(train_step(model, x, y, 1e-2))

    pbar.update(step, values=metrics.items(), finalize=False)
    step += 1
  manager.save()
  pbar.update(step, values=metrics.items(), finalize=True)
模型并行训练#
如果您切换到二维 Mesh,并沿第二个网格维度对模型变量进行分片,那么训练即变为模型并行训练。
在模型并行训练中,每个模型副本都会跨越多个设备(本例中为 2 个):
有 4 个模型副本,训练数据批次会分布至这 4 个副本。
单个模型副本中的 2 个设备会接收复制的训练数据。

mesh = dtensor.create_mesh([("batch", 4), ("model", 2)], devices=DEVICES)
model = MLP([dtensor.Layout([dtensor.UNSHARDED, "model"], mesh),
             dtensor.Layout(["model", dtensor.UNSHARDED], mesh)])
由于训练数据仍然沿批次维度进行分片,您可以重复使用与数据并行训练情况相同的 repack_batch 函数。DTensor 会自动将副本批次沿 "model" 网格维度复制到副本内的所有设备上。
def repack_batch(x, y, mesh):
  x = repack_local_tensor(x, layout=dtensor.Layout(['batch', dtensor.UNSHARDED], mesh))
  y = repack_local_tensor(y, layout=dtensor.Layout(['batch'], mesh))
  return x, y
接下来,运行训练循环。训练循环将重复使用与数据并行训练示例相同的检查点管理器,并且代码看起来完全相同。
您可以在模型并行训练下继续训练经过数据并行训练的模型。
num_epochs = 2
manager = start_checkpoint_manager(model)

for epoch in range(num_epochs):
  step = 0
  pbar = tf.keras.utils.Progbar(target=int(train_data_vec.cardinality()))
  metrics = {'epoch': epoch}
  for x,y in train_data_vec:
    x, y = repack_batch(x, y, mesh)
    metrics.update(train_step(model, x, y, 1e-2))
    pbar.update(step, values=metrics.items(), finalize=False)
    step += 1
  manager.save()
  pbar.update(step, values=metrics.items(), finalize=True)
空间并行训练#
训练维数特别高的数据(例如非常大的图像或视频)时,可能会需要沿特征维度进行分片。这称为空间分区,它首次被引入到 TensorFlow 中,用于训练具有大量三维输入样本的模型。

DTensor 也支持这种情况。您需要进行的唯一更改是创建一个包含 feature 维度的网格,并应用相应的 Layout。
mesh = dtensor.create_mesh([("batch", 2), ("feature", 2), ("model", 2)], devices=DEVICES)
model = MLP([dtensor.Layout(["feature", "model"], mesh),
             dtensor.Layout(["model", dtensor.UNSHARDED], mesh)])
将输入张量打包到 DTensor 时,沿 feature 维度对输入数据进行分片。您可以使用略有不同的 repack 函数 repack_batch_for_spt 来执行此操作,其中 spt 代表空间并行训练。
def repack_batch_for_spt(x, y, mesh):
    # Shard data on feature dimension, too
    x = repack_local_tensor(x, layout=dtensor.Layout(["batch", 'feature'], mesh))
    y = repack_local_tensor(y, layout=dtensor.Layout(["batch"], mesh))
    return x, y
空间并行训练也可以从使用其他并行训练方案创建的检查点继续。
num_epochs = 2

manager = start_checkpoint_manager(model)
for epoch in range(num_epochs):
  step = 0
  metrics = {'epoch': epoch}
  pbar = tf.keras.utils.Progbar(target=int(train_data_vec.cardinality()))

  for x, y in train_data_vec:
    x, y = repack_batch_for_spt(x, y, mesh)
    metrics.update(train_step(model, x, y, 1e-2))

    pbar.update(step, values=metrics.items(), finalize=False)
    step += 1
  manager.save()
  pbar.update(step, values=metrics.items(), finalize=True)
SavedModel 和 DTensor#
DTensor 与 SavedModel 的集成仍在开发中。
从 TensorFlow 2.11 开始,tf.saved_model 可以保存分片和复制的 DTensor 模型,并且保存将在网格的不同设备上进行高效的分片保存。但是,保存模型后,所有 DTensor 注解都会丢失,保存的签名只能用于常规张量,不能用于 DTensor。
mesh = dtensor.create_mesh([("world", 1)], devices=DEVICES[:1])
mlp = MLP([dtensor.Layout([dtensor.UNSHARDED, dtensor.UNSHARDED], mesh),
           dtensor.Layout([dtensor.UNSHARDED, dtensor.UNSHARDED], mesh)])

manager = start_checkpoint_manager(mlp)

model_for_saving = tf.keras.Sequential([
  text_vectorization,
  mlp
])

@tf.function(input_signature=[tf.TensorSpec([None], tf.string)])
def run(inputs):
  return {'result': model_for_saving(inputs)}

tf.saved_model.save(
    model_for_saving, "/tmp/saved_model",
    signatures=run)
截至 TensorFlow 2.9.0 版本,您只能使用规则张量或完全复制的 DTensor(将转换为规则张量)调用加载的签名。
sample_batch = train_data.take(1).get_single_element()
sample_batch
loaded = tf.saved_model.load("/tmp/saved_model")

run_sig = loaded.signatures["serving_default"]
result = run_sig(sample_batch['text'])['result']
np.mean(tf.argmax(result, axis=-1) == sample_batch['label'])
后续步骤#
本教程演示了使用 DTensor 构建和训练 MLP 情感分析模型的方式。
通过 Mesh 和 Layout 原语,DTensor 可以将 TensorFlow tf.function 转换为适合各种训练方案的分布式程序。
在现实世界的机器学习应用中,应当应用评估和交叉验证以避免产生过拟合模型。本教程中介绍的技术也可用于将并行性引入到评估当中。
从头开始使用 tf.Module 构建模型涉及到大量工作,而重复使用现有的构建块(例如层和辅助函数)可以大大加快模型开发速度。截至 TensorFlow 2.9 版本,tf.keras.layers 下的所有 Keras 层都接受 DTensor 布局作为其参数,并可用于构建 DTensor 模型。您甚至可以直接对 DTensor 重复使用 Keras 模型,而无需修改模型实现。有关使用 DTensor Keras 的信息,请参阅 DTensor Keras 集成教程。


