##### Copyright 2019 The TensorFlow Authors.
#@title Licensed under the Apache License, Version 2.0 (the "License");
# you may not use this file except in compliance with the License.
# You may obtain a copy of the License at
#
# https://www.apache.org/licenses/LICENSE-2.0
#
# Unless required by applicable law or agreed to in writing, software
# distributed under the License is distributed on an "AS IS" BASIS,
# WITHOUT WARRANTIES OR CONDITIONS OF ANY KIND, either express or implied.
# See the License for the specific language governing permissions and
# limitations under the License.
深度卷积生成对抗网络#
 在 TensorFlow.org上查看 在 TensorFlow.org上查看 |
 在 Google Colab 中运行 在 Google Colab 中运行 |
 在 GitHub 上查看源代码 在 GitHub 上查看源代码 |
 下载笔记本 下载笔记本 |
本教程演示了如何使用深度卷积生成对抗网络 (DCGAN) 生成手写数字的图像。该代码是使用 Keras 序列式 API 与 tf.GradientTape 训练循环编写的。
什么是生成对抗网络?#
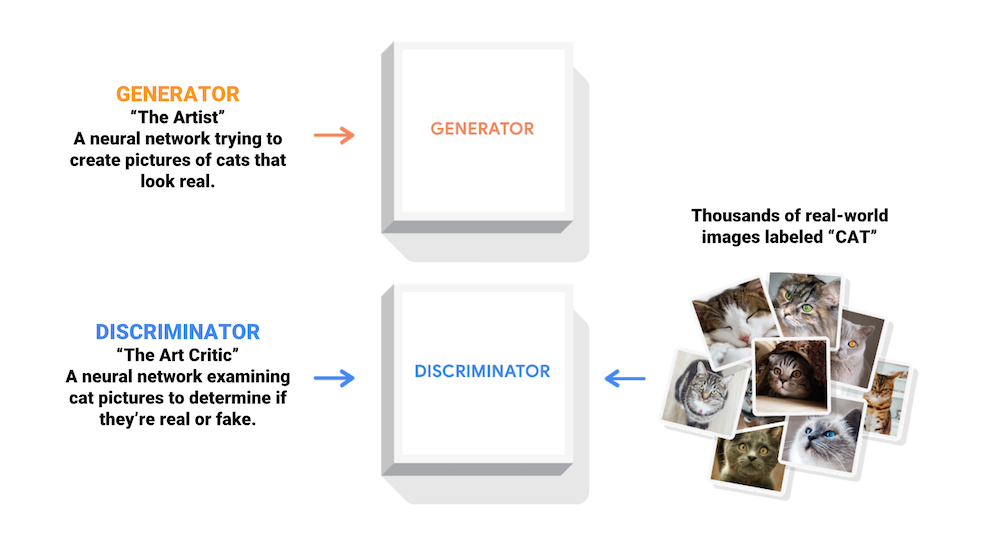
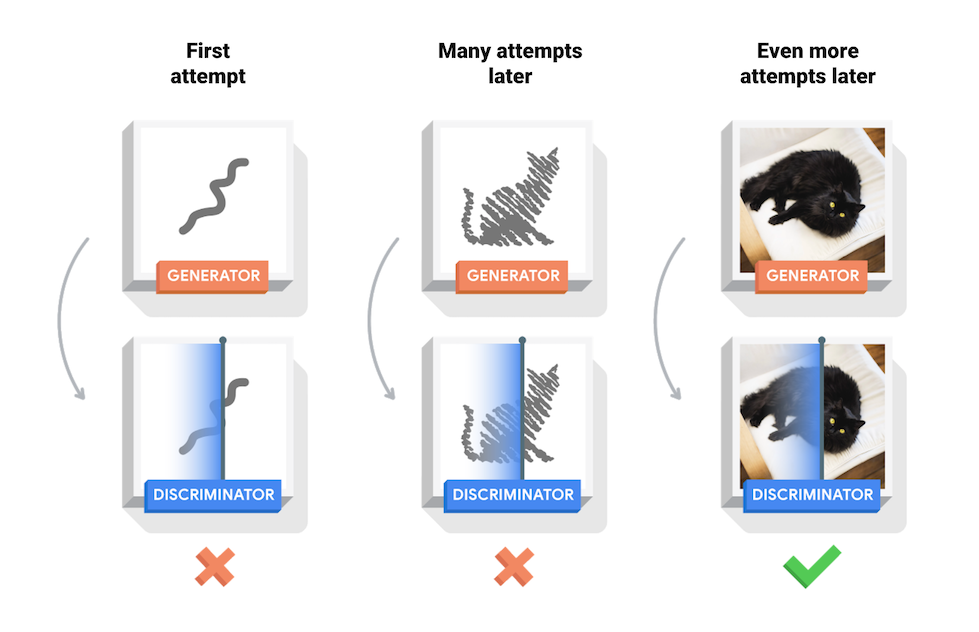
生成对抗网络 (GAN) 是当今计算机科学领域最有趣的想法之一。两个模型通过对抗过程同时训练。生成器(“艺术家”)学习创建看起来真实的图像,而判别器(“艺术评论家”)学习区分真假图像。

训练过程中,生成器在生成逼真图像方面逐渐变强,而判别器在辨别这些图像的能力上逐渐变强。当判别器不再能够区分真实图片和伪造图片时,训练过程达到平衡。

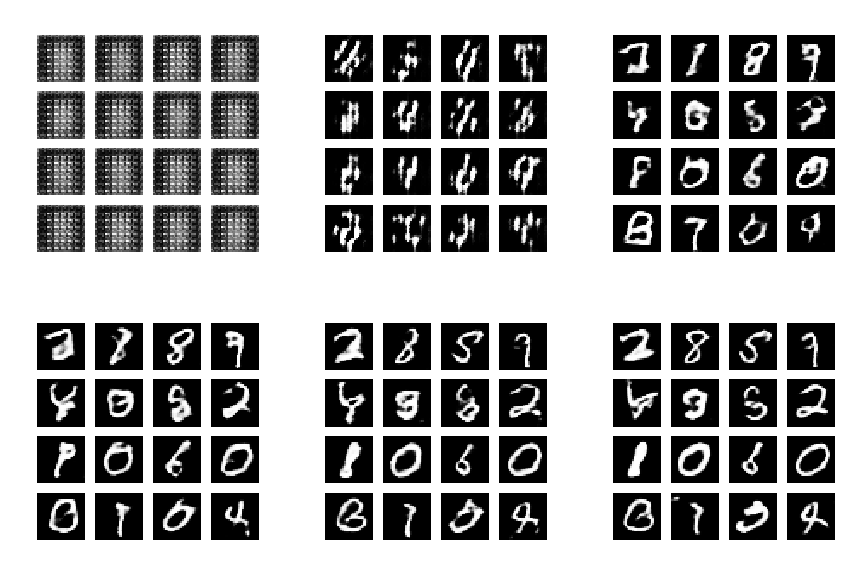
本笔记在 MNIST 数据集上演示了该过程。下方动画展示了当训练了 50 个epoch (全部数据集迭代50次) 时生成器所生成的一系列图片。图片从随机噪声开始,随着时间的推移越来越像手写数字。

要详细了解 GAN,请参阅 MIT 的深度学习介绍课程。
Import TensorFlow and other libraries#
import tensorflow as tf
tf.__version__
# To generate GIFs
!pip install imageio
!pip install git+https://github.com/tensorflow/docs
import glob
import imageio
import matplotlib.pyplot as plt
import numpy as np
import os
import PIL
from tensorflow.keras import layers
import time

from IPython import display
加载和准备数据集#
您将使用 MNIST 数据集来训练生成器和判别器。生成器将生成类似于 MNIST 数据集的手写数字。
(train_images, train_labels), (_, _) = tf.keras.datasets.mnist.load_data()
train_images = train_images.reshape(train_images.shape[0], 28, 28, 1).astype('float32')
train_images = (train_images - 127.5) / 127.5  # Normalize the images to [-1, 1]
BUFFER_SIZE = 60000
BATCH_SIZE = 256
# Batch and shuffle the data
train_dataset = tf.data.Dataset.from_tensor_slices(train_images).shuffle(BUFFER_SIZE).batch(BATCH_SIZE)
创建模型#
生成器和判别器均使用 Keras Sequential API 定义。
生成器#
生成器使用 tf.keras.layers.Conv2DTranspose(上采样)层来从种子(随机噪声)中生成图像。以一个使用该种子作为输入的 Dense 层开始,然后多次上采样,直至达到所需的 28x28x1 的图像大小。请注意,除了输出层使用双曲正切之外,其他每层均使用 tf.keras.layers.LeakyReLU 激活。
def make_generator_model():
    model = tf.keras.Sequential()
    model.add(layers.Dense(7*7*256, use_bias=False, input_shape=(100,)))
    model.add(layers.BatchNormalization())
    model.add(layers.LeakyReLU())

    model.add(layers.Reshape((7, 7, 256)))
    assert model.output_shape == (None, 7, 7, 256)  # Note: None is the batch size

    model.add(layers.Conv2DTranspose(128, (5, 5), strides=(1, 1), padding='same', use_bias=False))
    assert model.output_shape == (None, 7, 7, 128)
    model.add(layers.BatchNormalization())
    model.add(layers.LeakyReLU())

    model.add(layers.Conv2DTranspose(64, (5, 5), strides=(2, 2), padding='same', use_bias=False))
    assert model.output_shape == (None, 14, 14, 64)
    model.add(layers.BatchNormalization())
    model.add(layers.LeakyReLU())

    model.add(layers.Conv2DTranspose(1, (5, 5), strides=(2, 2), padding='same', use_bias=False, activation='tanh'))
    assert model.output_shape == (None, 28, 28, 1)

    return model
使用(尚未训练的)生成器创建一张图片。
generator = make_generator_model()

noise = tf.random.normal([1, 100])
generated_image = generator(noise, training=False)

plt.imshow(generated_image[0, :, :, 0], cmap='gray')
判别器#
判别器是一个基于 CNN 的图片分类器。
def make_discriminator_model():
    model = tf.keras.Sequential()
    model.add(layers.Conv2D(64, (5, 5), strides=(2, 2), padding='same',
                                     input_shape=[28, 28, 1]))
    model.add(layers.LeakyReLU())
    model.add(layers.Dropout(0.3))

    model.add(layers.Conv2D(128, (5, 5), strides=(2, 2), padding='same'))
    model.add(layers.LeakyReLU())
    model.add(layers.Dropout(0.3))

    model.add(layers.Flatten())
    model.add(layers.Dense(1))

    return model
使用(尚未训练的)判别器对所生成的图像进行真伪分类。模型将被训练为对真实图像输出正值,对伪造图像输出负值。
discriminator = make_discriminator_model()
decision = discriminator(generated_image)
print (decision)
定义损失函数和优化器#
为两个模型定义损失函数和优化器。
# This method returns a helper function to compute cross entropy loss
cross_entropy = tf.keras.losses.BinaryCrossentropy(from_logits=True)
判别器损失#
该方法量化判别器从判断真伪图片的能力。它将判别器对真实图片的预测值与值全为 1 的数组进行对比,将判别器对伪造(生成的)图片的预测值与值全为 0 的数组进行对比。
def discriminator_loss(real_output, fake_output):
    real_loss = cross_entropy(tf.ones_like(real_output), real_output)
    fake_loss = cross_entropy(tf.zeros_like(fake_output), fake_output)
    total_loss = real_loss + fake_loss
    return total_loss
生成器损失#
生成器的损失可量化其欺骗判别器的能力。直观地说,如果生成器表现良好,判别器会将伪造图像分类为真实图像(或 1)。在此,需要将判别器对生成图像的决策与值全为 1 的数组进行对比。
def generator_loss(fake_output):
    return cross_entropy(tf.ones_like(fake_output), fake_output)
判别器和生成器优化器不同,因为您将分别训练两个网络。
generator_optimizer = tf.keras.optimizers.Adam(1e-4)
discriminator_optimizer = tf.keras.optimizers.Adam(1e-4)
保存检查点#
本笔记还演示了如何保存和恢复模型,这在长时间训练任务被中断的情况下比较有帮助。
checkpoint_dir = './training_checkpoints'
checkpoint_prefix = os.path.join(checkpoint_dir, "ckpt")
checkpoint = tf.train.Checkpoint(generator_optimizer=generator_optimizer,
                                 discriminator_optimizer=discriminator_optimizer,
                                 generator=generator,
                                 discriminator=discriminator)
定义训练循环#
EPOCHS = 50
noise_dim = 100
num_examples_to_generate = 16

# You will reuse this seed overtime (so it's easier)
# to visualize progress in the animated GIF)
seed = tf.random.normal([num_examples_to_generate, noise_dim])
训练循环在生成器接收到一个随机种子作为输入时开始。该种子用于生成一个图像。判别器随后被用于对真实图像(选自训练集)和伪造图像(由生成器生成)进行分类。为每一个模型计算损失,并使用梯度更新生成器和判别器。
# Notice the use of `tf.function`
# This annotation causes the function to be "compiled".
@tf.function
def train_step(images):
    noise = tf.random.normal([BATCH_SIZE, noise_dim])

    with tf.GradientTape() as gen_tape, tf.GradientTape() as disc_tape:
      generated_images = generator(noise, training=True)

      real_output = discriminator(images, training=True)
      fake_output = discriminator(generated_images, training=True)

      gen_loss = generator_loss(fake_output)
      disc_loss = discriminator_loss(real_output, fake_output)

    gradients_of_generator = gen_tape.gradient(gen_loss, generator.trainable_variables)
    gradients_of_discriminator = disc_tape.gradient(disc_loss, discriminator.trainable_variables)

    generator_optimizer.apply_gradients(zip(gradients_of_generator, generator.trainable_variables))
    discriminator_optimizer.apply_gradients(zip(gradients_of_discriminator, discriminator.trainable_variables))
def train(dataset, epochs):
  for epoch in range(epochs):
    start = time.time()

    for image_batch in dataset:
      train_step(image_batch)

    # Produce images for the GIF as you go
    display.clear_output(wait=True)
    generate_and_save_images(generator,
                             epoch + 1,
                             seed)

    # Save the model every 15 epochs
    if (epoch + 1) % 15 == 0:
      checkpoint.save(file_prefix = checkpoint_prefix)

    print ('Time for epoch {} is {} sec'.format(epoch + 1, time.time()-start))

  # Generate after the final epoch
  display.clear_output(wait=True)
  generate_and_save_images(generator,
                           epochs,
                           seed)
生成与保存图片
def generate_and_save_images(model, epoch, test_input):
  # Notice `training` is set to False.
  # This is so all layers run in inference mode (batchnorm).
  predictions = model(test_input, training=False)

  fig = plt.figure(figsize=(4, 4))

  for i in range(predictions.shape[0]):
      plt.subplot(4, 4, i+1)
      plt.imshow(predictions[i, :, :, 0] * 127.5 + 127.5, cmap='gray')
      plt.axis('off')

  plt.savefig('image_at_epoch_{:04d}.png'.format(epoch))
  plt.show()
训练模型#
调用上面定义的 train() 方法来同时训练生成器和判别器。注意,训练 GANs 可能是棘手的。重要的是,生成器和判别器不能够互相压制对方(例如,他们以相似的学习率训练)。
在训练之初,生成的图片看起来像是随机噪声。随着训练过程的进行,生成的数字将越来越真实。在大概 50 个 epoch 之后,这些图片看起来像是 MNIST 数字。使用 Colab 中的默认设置可能需要大约 1 分钟每 epoch。
train(train_dataset, EPOCHS)
恢复最新的检查点。
checkpoint.restore(tf.train.latest_checkpoint(checkpoint_dir))
创建 GIF#
# Display a single image using the epoch number
def display_image(epoch_no):
  return PIL.Image.open('image_at_epoch_{:04d}.png'.format(epoch_no))
display_image(EPOCHS)
使用训练过程中生成的图片通过 imageio 生成动态 gif
anim_file = 'dcgan.gif'

with imageio.get_writer(anim_file, mode='I') as writer:
  filenames = glob.glob('image*.png')
  filenames = sorted(filenames)
  for filename in filenames:
    image = imageio.imread(filename)
    writer.append_data(image)
  image = imageio.imread(filename)
  writer.append_data(image)
import tensorflow_docs.vis.embed as embed
embed.embed_file(anim_file)
下一步#
本教程展示了编写和训练 GAN 所需的完整代码。下一步,您可能想尝试不同的数据集,例如 Kaggle 上提供的 Large-scale Celeb Faces Attributes (CelebA) 人脸识别数据集。要详细了解 GAN,请参阅 NIPS 2016 教程:生成对抗网络。


