TensorFlow 基础知识#
 转到TensorFlow.org 转到TensorFlow.org
|
 在 Google Colab 中运行 在 Google Colab 中运行 |
 在 GitHub 上查看源代码 在 GitHub 上查看源代码 |
 下载笔记本 下载笔记本 |
本指南提供TensorFlow 基础知识的快速概览。本文档的每个部分都是对一个大主题的概述——您可以在每个部分的末尾找到指向完整指南的链接。
TensorFlow 是一个端到端的机器学习平台。它支持以下内容:
基于多维数组的数值计算(类似于NumPy 。)
GPU 和分布式处理
自动微分
模型构造、训练和导出
及更多内容
import os
os.environ['TF_CPP_MIN_LOG_LEVEL'] = '3'  # 设置日志级别为ERROR,以减少警告信息
# 禁用 Gemini 的底层库(gRPC 和 Abseil)在初始化日志警告
os.environ["GRPC_VERBOSITY"] = "ERROR"
os.environ["GLOG_minloglevel"] = "3"  # 0: INFO, 1: WARNING, 2: ERROR, 3: FATAL
os.environ["GLOG_minloglevel"] = "true"
import logging
import tensorflow as tf
tf.get_logger().setLevel(logging.ERROR)
tf.compat.v1.logging.set_verbosity(tf.compat.v1.logging.ERROR)
!export TF_FORCE_GPU_ALLOW_GROWTH=true
from pathlib import Path

temp_dir = Path(".temp")
temp_dir.mkdir(parents=True, exist_ok=True)
张量#
TensorFlow 对tf.Tensor对象表示的多维数组或张量进行运算。下面一个二维张量:
import tensorflow as tf

x = tf.constant([[1., 2., 3.],
                 [4., 5., 6.]])

print(x)
print(x.shape)
print(x.dtype)
tf.Tensor(
[[1. 2. 3.]
 [4. 5. 6.]], shape=(2, 3), dtype=float32)
(2, 3)
<dtype: 'float32'>
tf.Tensor最重要的属性是它的shape(形状)和dtype(数据类型) :
Tensor.shape:表示张量每个轴上的大小。Tensor.dtype:表示张量中所有元素的类型。
TensorFlow 实现了对张量的标准数学运算,以及许多机器学习的专用操作。
例如:
x + x
<tf.Tensor: shape=(2, 3), dtype=float32, numpy=
array([[ 2.,  4.,  6.],
       [ 8., 10., 12.]], dtype=float32)>
5 * x
<tf.Tensor: shape=(2, 3), dtype=float32, numpy=
array([[ 5., 10., 15.],
       [20., 25., 30.]], dtype=float32)>
x @ tf.transpose(x)
<tf.Tensor: shape=(2, 2), dtype=float32, numpy=
array([[14., 32.],
       [32., 77.]], dtype=float32)>
tf.concat([x, x, x], axis=0)
<tf.Tensor: shape=(6, 3), dtype=float32, numpy=
array([[1., 2., 3.],
       [4., 5., 6.],
       [1., 2., 3.],
       [4., 5., 6.],
       [1., 2., 3.],
       [4., 5., 6.]], dtype=float32)>
tf.nn.softmax(x, axis=-1)
<tf.Tensor: shape=(2, 3), dtype=float32, numpy=
array([[0.09003057, 0.24472848, 0.6652409 ],
       [0.09003057, 0.24472848, 0.6652409 ]], dtype=float32)>
tf.reduce_sum(x)
<tf.Tensor: shape=(), dtype=float32, numpy=21.0>
注:通常,在 TensorFlow 函数需要 Tensor 作为输入的任何地方,该函数也将接受可使用 tf.convert_to_tensor 转换为 Tensor 的任何内容。请参见下面的示例。
tf.convert_to_tensor([1,2,3])
<tf.Tensor: shape=(3,), dtype=int32, numpy=array([1, 2, 3], dtype=int32)>
tf.reduce_sum([1,2,3])
<tf.Tensor: shape=(), dtype=int32, numpy=6>
在 CPU 上运行大型计算可能会很慢。配置正确的 TensorFlow 可以使用 GPU 等加速硬件非常快速地运算。
if tf.config.list_physical_devices('GPU'):
  print("TensorFlow **IS** using the GPU")
else:
  print("TensorFlow **IS NOT** using the GPU")
TensorFlow **IS** using the GPU
详情参阅 Tensor guide (张量指南)。
变量#
普通的tf.Tensor对象是不可变的。要在 TensorFlow 中存储模型权重(或其他可变状态),请使用tf.Variable 。
var = tf.Variable([0.0, 0.0, 0.0])
var
<tf.Variable 'Variable:0' shape=(3,) dtype=float32, numpy=array([0., 0., 0.], dtype=float32)>
var.assign([1, 2, 3])
<tf.Variable 'UnreadVariable' shape=(3,) dtype=float32, numpy=array([1., 2., 3.], dtype=float32)>
var.assign_add([1, 1, 1])
<tf.Variable 'UnreadVariable' shape=(3,) dtype=float32, numpy=array([2., 3., 4.], dtype=float32)>
详见 Variables guide (变量指南)。
自动微分#
Gradient descent(梯度下降)及相关算法是现代机器学习的基础。
为此,TensorFlow 实现了自动微分 (autodiff),它使用微积分来计算梯度。通常用它来计算模型基于其权重的误差或损失的梯度。
x = tf.Variable(1.0)

def f(x):
  y = x**2 + 2*x - 5
  return y
f(x)
<tf.Tensor: shape=(), dtype=float32, numpy=-2.0>
在 x = 1.0, y = f(x) = (1**2 + 2*1 - 5) = -2.
y的导数是 y' = f'(x) = (2*x + 2) = 4 。 TensorFlow 可以自动计算:
with tf.GradientTape() as tape:
  y = f(x)

g_x = tape.gradient(y, x)  # g(x) = dy/dx

g_x
<tf.Tensor: shape=(), dtype=float32, numpy=4.0>
这个简化的例子只对单个标量 ( x ) 求导,但 TensorFlow 可以同时计算任意数量的非标量张量的梯度。
详见 Autodiff guide (自动微分)。
图和 tf.function装饰器#
TensorFlow 可以像任何 Python 库一样以交互方式使用,同时还提供以下工具:
性能优化:加速训练和推理。
导出:保存训练好的模型。
这就要用 tf.function 装饰器将纯 TensorFlow 代码与普通 Python 代码隔离开来。
@tf.function
def my_func(x):
  print('Tracing.\n')
  return tf.reduce_sum(x)
第一次运行由tf.function装饰的函数时,虽然它在 Python 中执行,但它会取得经由 TensorFlow 计算的完整优化图。
x = tf.constant([1, 2, 3])
my_func(x)
Tracing.
<tf.Tensor: shape=(), dtype=int32, numpy=6>
在后续调用中,TensorFlow 仅执行优化图,跳过所有非 TensorFlow 步骤。注意下面的my_func不打印Tracing,因为print是 Python 函数,而不是 TensorFlow 函数。
x = tf.constant([10, 9, 8])
my_func(x)
<tf.Tensor: shape=(), dtype=int32, numpy=27>
输入的签名(shape和dtype )不同,就不能使用原来的计算图,要生成新计算图:
x = tf.constant([10.0, 9.1, 8.2], dtype=tf.float32)
my_func(x)
Tracing.
<tf.Tensor: shape=(), dtype=float32, numpy=27.3>
这些取得的图提供了两个好处:
详见 Intro to graphs (计算图的说明).
模块、层和模型#
tf.Module是一个类,用于管理tf.Variable对象以及对它们进行操作的tf.function对象。 有了tf.Module类,才能支持下面两个重要特性:
可以用
tf.train.Checkpoint保存和恢复变量的值。因为可以快速保存和恢复模型的状态,所以在训练期间很有用。可以用
tf.saved_model导入和导出tf.Variable值和tf.function图。这使得模型可以不依赖原来的 Python 程序独立运行。
下面是导出简单 tf.Module 对象的完整例子:
class MyModule(tf.Module):
  def __init__(self, value):
    self.weight = tf.Variable(value)

  @tf.function
  def multiply(self, x):
    return x * self.weight
mod = MyModule(3)
mod.multiply(tf.constant([1, 2, 3]))
<tf.Tensor: shape=(3,), dtype=int32, numpy=array([3, 6, 9], dtype=int32)>
保存Module :
save_path = temp_dir/'./saved'
tf.saved_model.save(mod, save_path)
保存的图独立于创建它的代码。您可以从 Python、其他语言绑定或TensorFlow Serving加载保存的图。还可以通过转换,让它在TensorFlow Lite或TensorFlow JS上运行。
reloaded = tf.saved_model.load(save_path)
reloaded.multiply(tf.constant([1, 2, 3]))
<tf.Tensor: shape=(3,), dtype=int32, numpy=array([3, 6, 9], dtype=int32)>
建立在tf.Module上的tf.keras.layers.Layer类和tf.keras.Model类,为构建、训练和保存模型提供了更多的功能和便利。下一节中将展示其中一部分。
详见 Intro to modules (模块介绍).
训练循环#
现在用这些东西一起构建基本模型并从头开始训练。
首先,生成一些示例数据,这是一些围绕二次曲线的松散的点形成的云:
import matplotlib
from matplotlib import pyplot as plt

matplotlib.rcParams['figure.figsize'] = [9, 6]
x = tf.linspace(-2, 2, 201)
x = tf.cast(x, tf.float32)

def f(x):
  y = x**2 + 2*x - 5
  return y

y = f(x) + tf.random.normal(shape=[201])

plt.plot(x.numpy(), y.numpy(), '.', label='Data')
plt.plot(x, f(x), label='Ground truth')
plt.legend();
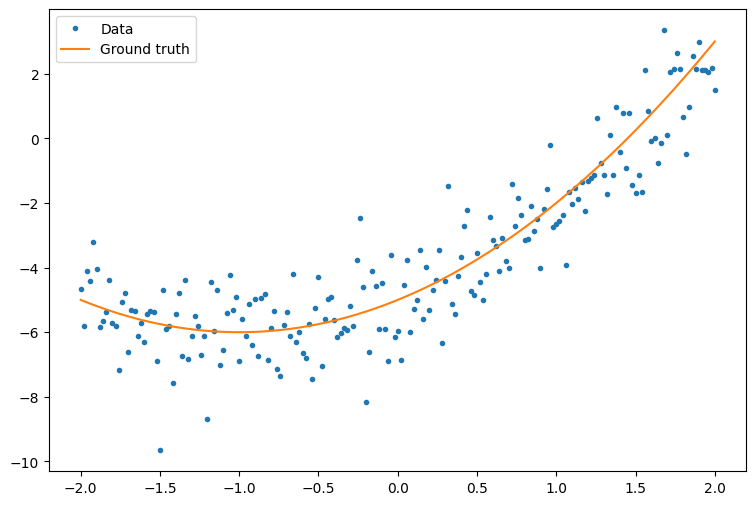
创建具有随机初始化权重和偏差的二次模型:
class Model(tf.Module):

  def __init__(self):
    # Randomly generate weight and bias terms
    rand_init = tf.random.uniform(shape=[3], minval=0., maxval=5., seed=22)
    # Initialize model parameters
    self.w_q = tf.Variable(rand_init[0])
    self.w_l = tf.Variable(rand_init[1])
    self.b = tf.Variable(rand_init[2])

  @tf.function
  def __call__(self, x):
    # Quadratic Model : quadratic_weight * x^2 + linear_weight * x + bias
    return self.w_q * (x**2) + self.w_l * x + self.b
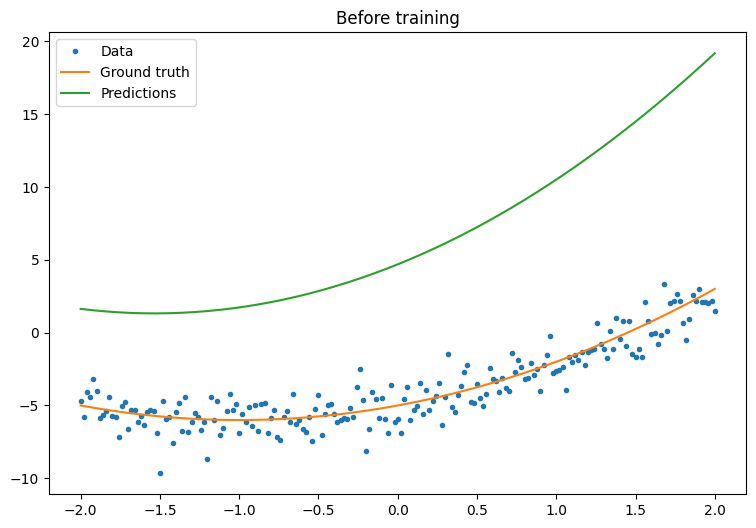
首先,在训练前观察您的模型的性能:
quad_model = Model()
def plot_preds(x, y, f, model, title):
  plt.figure()
  plt.plot(x, y, '.', label='Data')
  plt.plot(x, f(x), label='Ground truth')
  plt.plot(x, model(x), label='Predictions')
  plt.title(title)
  plt.legend()
plot_preds(x, y, f, quad_model, 'Before training')
现在,为您的模型定义损失:
鉴于此模型的作用是预测连续值,因此均方误差 (MSE) 是损失函数的不错选择。给定一个预测向量 \(\hat{y}\) 和一个真实目标向量 \(y\),MSE 被定义为预测值与基准值之间平方差的平均值。
\(MSE = \frac{1}{m}\sum_{i=1}^{m}(\hat{y}_i -y_i)^2\)
def mse_loss(y_pred, y):
  return tf.reduce_mean(tf.square(y_pred - y))
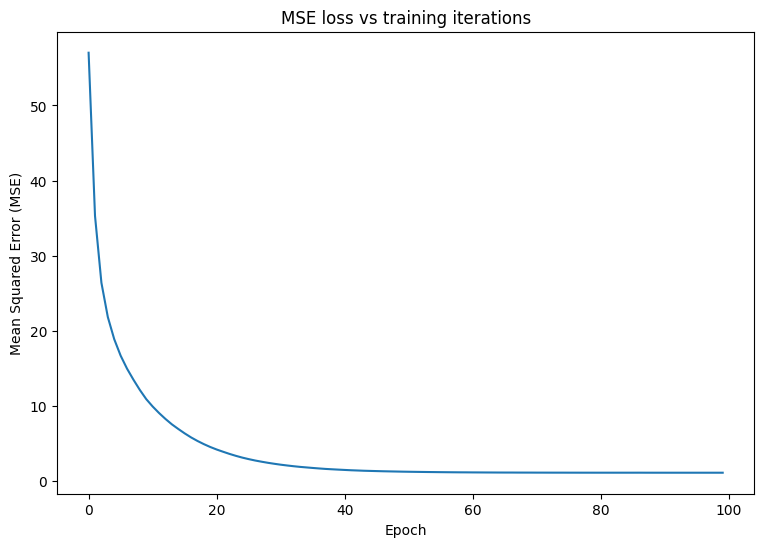
为模型编写一个基本训练循环。此循环将利用 MSE 损失函数及其相对于输入的梯度来迭代更新模型的参数。使用 mini-batch 进行训练可以提供内存效率和更快的收敛速度。tf.data.Dataset API 具有用于批处理和重排的实用函数。
batch_size = 32
dataset = tf.data.Dataset.from_tensor_slices((x, y))
dataset = dataset.shuffle(buffer_size=x.shape[0]).batch(batch_size)
# Set training parameters
epochs = 100
learning_rate = 0.01
losses = []

# Format training loop
for epoch in range(epochs):
  for x_batch, y_batch in dataset:
    with tf.GradientTape() as tape:
      batch_loss = mse_loss(quad_model(x_batch), y_batch)
    # Update parameters with respect to the gradient calculations
    grads = tape.gradient(batch_loss, quad_model.variables)
    for g, v in zip(grads, quad_model.variables):
        v.assign_sub(learning_rate*g)
  # Keep track of model loss per epoch
  loss = mse_loss(quad_model(x), y)
  losses.append(loss)
  if epoch % 10 == 0:
    print(f'Mean squared error for step {epoch}: {loss.numpy():0.3f}')

# Plot model results
print("\n")
plt.plot(range(epochs), losses)
plt.xlabel("Epoch")
plt.ylabel("Mean Squared Error (MSE)")
plt.title('MSE loss vs training iterations');
Mean squared error for step 0: 57.023
Mean squared error for step 10: 9.908
Mean squared error for step 20: 4.178
Mean squared error for step 30: 2.158
Mean squared error for step 40: 1.459
Mean squared error for step 50: 1.218
Mean squared error for step 60: 1.131
Mean squared error for step 70: 1.102
Mean squared error for step 80: 1.094
Mean squared error for step 90: 1.091
现在,观察模型在训练后的性能:
plot_preds(x, y, f, quad_model, 'After training')
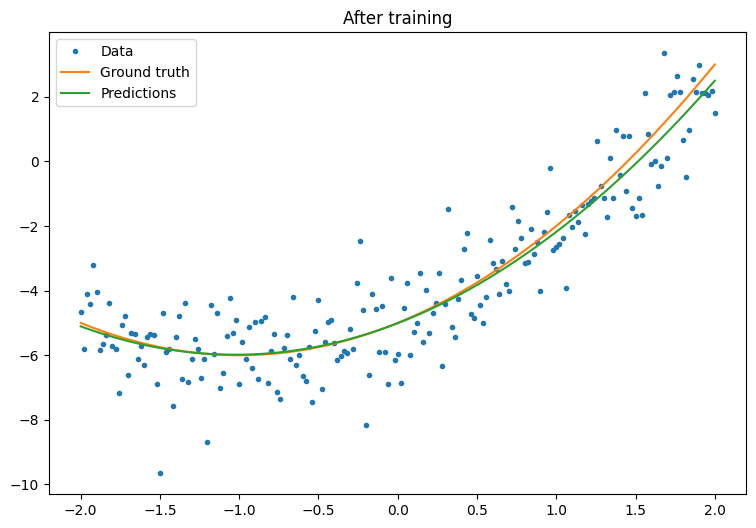
成功了,但请记住,tf.keras 模块中提供了常见训练实用工具的实现。因此在您自己动手编写之前,请优先考虑使用现成的内容。首先,Model.compile 和 Model.fit 方法为您实现了训练循环:
首先,使用 tf.keras.Sequential 在 Keras 中创建序贯模型。最简单的 Keras 层之一是密集层,可以使用 tf.keras.layers.Dense 进行实例化。密集层能够学习 \(\mathrm{Y} = \mathrm{W}\mathrm{X} + \vec{b}\) 形式的多维线性关系。要学习 \(w_1x^2 + w_2x + b\) 形式的非线性方程,密集层的输入应当是一个以 \(x^2\) 和 \(x\) 为特征的数据矩阵。lambda 层 tf.keras.layers.Lambda 可用于执行这种堆叠转换。
new_model = tf.keras.Sequential([
    tf.keras.layers.Lambda(lambda x: tf.stack([x, x**2], axis=1)),
    tf.keras.layers.Dense(units=1, kernel_initializer=tf.random.normal)])
new_model.compile(
    loss=tf.keras.losses.MSE,
    optimizer=tf.keras.optimizers.SGD(learning_rate=0.01))

history = new_model.fit(x, y,
                        epochs=100,
                        batch_size=32,
                        verbose=0)

new_model.save(temp_dir/'./my_new_model.keras')
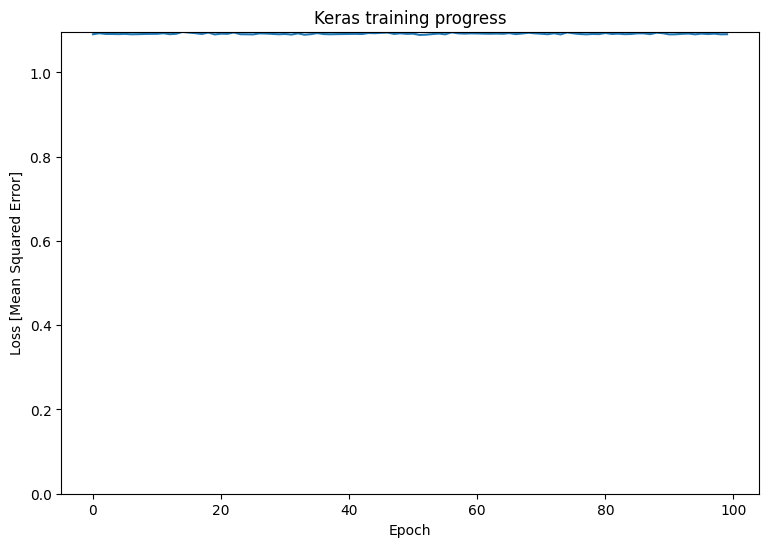
训练后观察 Keras 模型的性能:
plt.plot(history.history['loss'])
plt.xlabel('Epoch')
plt.ylim([0, max(plt.ylim())])
plt.ylabel('Loss [Mean Squared Error]')
plt.title('Keras training progress');
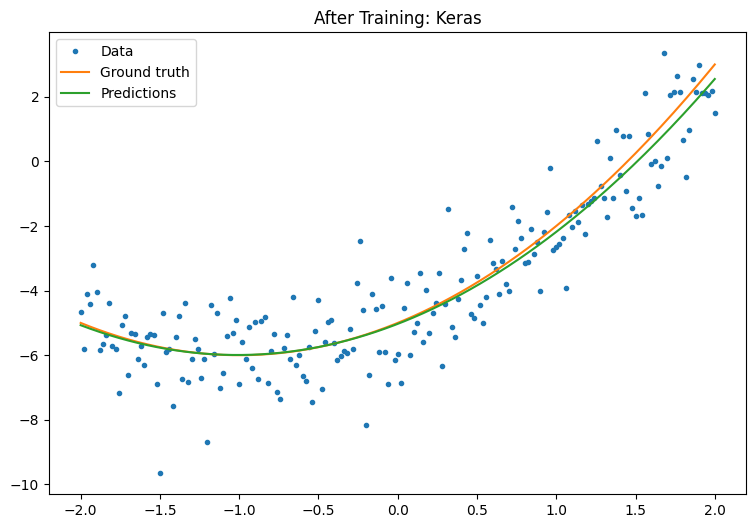
plot_preds(x, y, f, new_model, 'After Training: Keras')
